If you anything like me, you break stuff. (Like.. all the time.)
This quick tutorial is about how to un-brick a Particle Mesh board using J-Link.
This method may seem scary. It sure was when I started! The good thing is that anything done wrong here is reversible.
Let’s get going!
Prerequisites
- You will need
jlinkexeinstalled if you haven’t already. Go here and find the J-link Software and Documentation Pack. - You’ll need to download the latest Nordic softdevice. As of this writing it’s
s140_nrf52_6.0.0_softdevice.hex. It’s also the one that Particle is currently using. - You’ll also need a 10-pin ribbon cable that is compatible. If you don’t have one, a reasonable one can be found at Adafruit.
Now let’s un-bork you board!
-
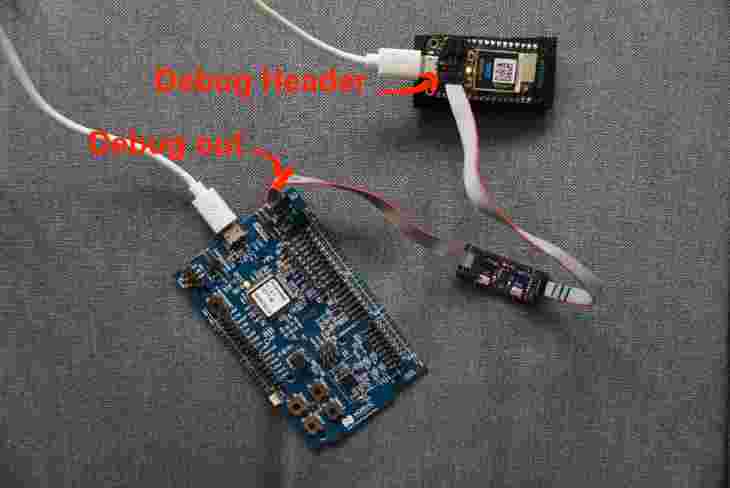
Connect nRF52 dev kit (or similar) to your computer
-
Connect the 10pin ribbon cable to the Debug out connector on the NRF52 dev kit.
-
Connect to
jlinkexeusing the following commandjlinkexe -device nRF52 -if SWD -speed 4000 -autoconnect 1If all is well,
jlinkexewill connect and the output will look something like this:Jareds-MacBook-Pro:nrfjprog.sh jaredwolff$ jlinkexe -device nRF52 -if SWD -speed 4000 -autoconnect 1 SEGGER J-Link Commander V6.40b (Compiled Jan 22 2019 11:31:00) DLL version V6.40b, compiled Jan 22 2019 11:30:49 Connecting to J-Link via USB...O.K. Firmware: J-Link OB-SAM3U128-V2-NordicSemi compiled Jan 7 2019 14:07:15 Hardware version: V1.00 S/N: 682978319 VTref=3.300V Device "NRF52" selected. Connecting to target via SWD Found SW-DP with ID 0x2BA01477 Found SW-DP with ID 0x2BA01477 Scanning AP map to find all available APs AP[2]: Stopped AP scan as end of AP map has been reached AP[0]: AHB-AP (IDR: 0x24770011) AP[1]: JTAG-AP (IDR: 0x02880000) Iterating through AP map to find AHB-AP to use AP[0]: Core found AP[0]: AHB-AP ROM base: 0xE00FF000 CPUID register: 0x410FC241. Implementer code: 0x41 (ARM) Found Cortex-M4 r0p1, Little endian. FPUnit: 6 code (BP) slots and 2 literal slots CoreSight components: ROMTbl[0] @ E00FF000 ROMTbl[0][0]: E000E000, CID: B105E00D, PID: 000BB00C SCS-M7 ROMTbl[0][1]: E0001000, CID: B105E00D, PID: 003BB002 DWT ROMTbl[0][2]: E0002000, CID: B105E00D, PID: 002BB003 FPB ROMTbl[0][3]: E0000000, CID: B105E00D, PID: 003BB001 ITM ROMTbl[0][4]: E0040000, CID: B105900D, PID: 000BB9A1 TPIU ROMTbl[0][5]: E0041000, CID: B105900D, PID: 000BB925 ETM Cortex-M4 identified. J-Link> -
Next let’s erase the whole chip + write the softdevice.
 h
 w4 4001e504 2
 w4 4001e50c 1
 sleep 100
 r
 h
 w4 4001e504 1
 loadfile /path/to/s140_nrf52_6.0.0_softdevice.hex
 r
Let’s go through each command:
his to halt the chip from executing codew4 4001e504 2is writing to the magic control register to allow erase to flashw4 4001e50c 1is the command to erase the whole chipris to reset the device andhis to halt againw4 4001e504 1is to allow writes to flash so we can write the soft deviceloadfileloads the file into flash. If it’s a hex file we only need one parameterwe finally reset with
r -
Next let’s write the bootloader
 h
 w4 4001e504 1
 loadfile /path/to/xenon-bootloader@1.3.0-rc.1.bin 0xf4000
 r
 h
 w4 4001e504 2
 w4 4001e514 1
 w4 4001e504 1
 w4 10001014 0xf4000
 w4 4001e504 0
 r
 g
 exit
Let’s break down some of the new commands here:
loadfilewrites a binary file. The address parameter is required. We use0xf4000because that is the starting address for the bootloader.After
loadfilewe want to make sure the processor is stopped withrandhw4 4001e504 2enables an erase but this time we’ll only erase the UICR. The UICR is a non-volatile part of memory used to track reset information, boot vectors, etc. We erase it first withw4 4001e514 1Then, using
w4 10001014 0xf4000, we write the bootloader address to10001014. That way, the NRF52840 boots to the correct location!w4 4001e504 0disables write mode.We finish up with a
rgandexit. This will reset, start execution and exit fromjlinkexeWe’re done here!

At the end of step 5, your device should be blinking yellow. You can follow the standard procedure using particle flash
The easier alternative
I’ve also modified a shell script written a long time ago before Nordic had a stable command line tool for OSX.
- Clone
git clone git@github.com:jaredwolff/nrfjprog.sh.git - Change to that directory
- Run
./nrfjprog.sh --flash-softdevice /path/to/s140_nrf52_6.0.0_softdevice.hex - Then, run
./nrfjprog.sh --flash-bootloader-bin /path/to/xenon-bootloader@1.3.0-rc.1.bin 0xf4000 - The device should be blinking yellow. Next, let’s program the system part:
particle flash --usb /path/to/xenon-system-part1@1.3.0-rc.1.bin - Finally, lets flash Tinker to make sure everything works!
particle flash --usb /path/to/xenon-tinker@1.3.0-rc.1.bin
Note: you can substitute the deviceOS version that i’ve used above. Just make sure they’re the same.
Conclusion
That’s it for this quick tutorial. Hope you found it useful!
Last Modified: 2020.4.8